DevOps for small / medium web apps - Part 2 - Continuous Integration
Summary
- Introduction
- Simple application
- GitLab project creation
- Run the application locally
- Commit and first CI pipeline
Introduction
This tutorial part introduces a simple Continuous Integration pipeline based on GitLab CI/CD. Although we keep it simple now, this pipeline will be extended in the next parts.
Simple application
This tutorial is based on a simple web application written on top of Spring Boot (for the backend) and React (for the frontend).
The application consists in a todo list where a user can add or remove items. The goal is to have a simple 3-tier architecture with enough features that allow us to explore important concepts:
- The file organization shows a way to combine backend and frontend code into a single module (to keep it simple).
- The backend is stateless, which means that it doesn’t store any data (e.g. no shared variable in the code); instead, the data is saved in a database. This architecture is particularly useful for horizontal scaling.
- Because a relational database is involved, this project demonstrates how to use Flyway to help to upgrade the schema when the application evolves.
- The build process involves Npm, Babel, Webpack and Maven to compile and package the application for production.
- Code quality is achieved thanks to SonarQube, a tool that can detect bugs in the code and help us to maintain the project over time.
GitLab project creation
Let’s start by creating a project on GitLab:
- Open GitLab in your web browser (the URL must be like https://gitlab.my-sample-domain.xyz/);
- Click on the “New…” item in the top menu (with a ‘+’ icon) and select “New project”;
- Fill the new form with the following information:
- Project name = todolist
- Project slug = todolist
- Visibility Level = Private
- Click on the “Create project” button.
We now have a project but we cannot download it on our computer yet; for that we need to generate and register a SSH key:
- In your GitLab web browser tab, click on your avatar (top-right of the page) and select “Settings”;
- Click on the “SSH Keys” item in the left menu;
- Open a terminal and type the following commands:
# Generate a SSH certificate (set the email address you set in your GitLab profile) ssh-keygen -o -t rsa -C "john.doe@your-company.com" -b 4096 # Display the public key cat ~/.ssh/id_rsa.pub - Copy the result of the
catcommand and paste in the “Key” field (in the GitLab web browser tab); - The “Title” field should be automatically filled with your email address; The page should look like this:
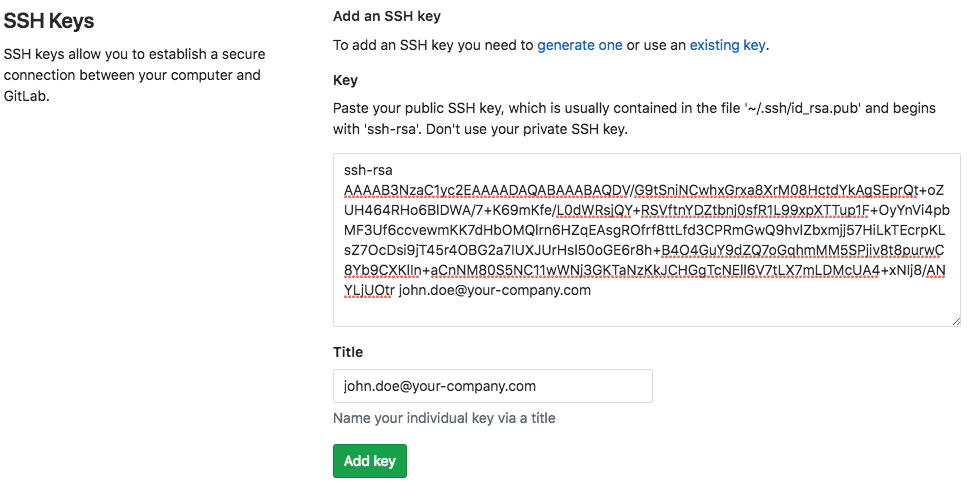
- Click on the “Add key” button in order to register your SSH key.
You can now configure git and clone the project on your computer. Enter the following commands in your terminal:
# Set your real name
git config --global user.name "John Doe"

# Set the same email address as the one you set in your GitLab profile
git config --global user.email "john.doe@your-company.com"

# Create a directory for your projects
mkdir ~/projects
cd ~/projects

# Clone the empty project on your computer (set your GitLab domain name and username)
git clone git@gitlab.my-sample-domain.xyz:johndoe/todolist.git

# Change directory and check the ".git" folder is present
cd todolist
ls -la
Copy all the files from the folder “sample-app/version1/*” of this tutorial into “~/projects/todolist”. You should have a directory with the following top files:
- .git - Folder containing information for git.
- .gitignore - List of files to ignore for Git.
- .gitlab-ci.yml - GitLab CI pipeline configuration (more information about this file later).
- package.json - Npm configuration for the frontend: it declares dependencies such as React, Babel and Webpack.
- webpack.config.js - Webpack configuration for the frontend: it contains information about how to transpile the JSX code into standard JavaScript supported by all modern web browsers. It also describes how to package the frontend code and place it into a folder where Spring Boot can pick it and serves it via HTTP.
- pom.xml - Maven configuration for the backend: it declares dependencies, how to compile the code, how to run the tests, and how to package the complete application.
- src - Source code of the application.
The “src” folder is organized like this:
- src/main/java - Backend code in Java. The entry-point is “com/alibaba/intl/todolist/Application.java”.
- src/main/js - Frontend code. The entry-point is “app.js”.
- src/main/resources/application.properties - Backend configuration (e.g. database url).
- src/main/resources/static - Frontend code (HTML, CSS and JavaScript). The “built” folder is generated by Webpack.
- src/main/resources/db/migration - Database scripts for Flyway (more on this later).
- src/test/java - Backend tests.
- src/test/resources - Backend tests configuration.
Run the application locally
Install the JDK 8 and Maven on your computer, and build your application with the following command:
mvn clean package
This command should end with a “BUILD SUCCESS” message: it compiles, runs the tests and packages the application.
Notes:
- The application source code organization is based on this tutorial. You can read this document if you are interested in HATEOAS, WebSockets and Spring Security.
- Although the application needs a database, the tests pass because they use H2, an in-memory database.
The next step is to setup a database locally:
- Download and install MySQL Community Server v5.7; note that it will normally give you a temporary root password.
- MySQL should have installed the MySQL Command-Line Tool. You
may need to configure your PATH environment variable if the
mysqlcommand is not available on your terminal. On Mac OSX you can do the following:# Add the MySQL tools into the PATH variable echo 'export PATH=/usr/local/mysql/bin:$PATH' >> ~/.bash_profile # Reload .bash_profile . ~/.bash_profile - Launch MySQL on your computer and connect to it with your terminal:
# Connect to the database (use the password you received during the installation) mysql -u root -p - The command above should display a prompt. You can now configure your database:
-- Change the root password if you never did it before on this database
ALTER USER 'root'@'localhost' IDENTIFIED BY 'YouNewRootPassword';

-- Create a database for our project
CREATE DATABASE todolist;

-- Create a user for our project and grant him the rights
CREATE USER 'todolist'@'localhost' IDENTIFIED BY 'P@ssw0rd';
GRANT ALL PRIVILEGES ON todolist.* TO 'todolist'@'localhost';

-- Exit
QUIT;
Now that we have a database up and running, we need to configure the application. Have a look at the backend configuration file “src/main/resources/application.properties” and check that the DB configuration corresponds to your installation:
spring.datasource.url=jdbc:mysql://localhost:3306/todolist?useSSL=false
spring.datasource.username=todolist
spring.datasource.password=P@ssw0rd
Note 0: The spring.datasource.url property is in the format “jdbc:mysql://HOSTNAME:PORT/DATABASE_NAME?useSSL=false”.
Note 1: If you modified this file you need to re-run mvn clean package.
You can now launch the application locally with the following command:
mvn spring-boot:run
If everything went well, the application should print several lines of logs in the console. Look at the two last lines:
2018-11-02 13:56:18.139  INFO 87329 --- [main] o.s.b.w.embedded.tomcat.TomcatWebServer  : Tomcat started on port(s): 8080 (http) with context path ''
2018-11-02 13:56:18.145  INFO 87329 --- [main] com.alibaba.intl.todolist.Application    : Started Application in 5.305 seconds (JVM running for 17.412)
Open a new tab in your web browser and open the url “http://localhost:8080”. You should normally get something like this:
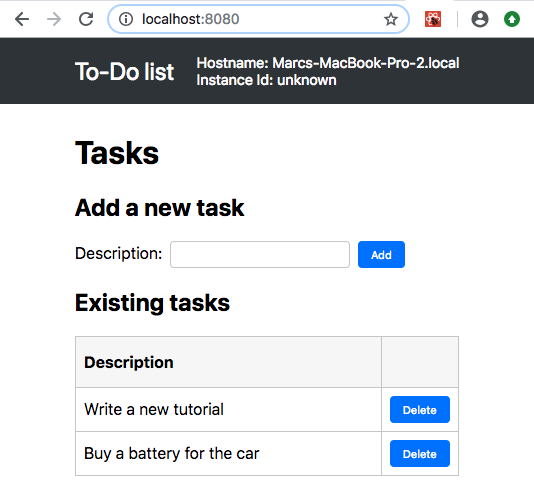
Note: you can add new tasks by filling a description and by clicking on the “Add” button.
Congratulation if you managed to get the application up and running! The source code has been written with the IntelliJ IDEA IDE (the ultimate edition is necessary for frontend development, you can evaluate it for free for 30 days).
Before we move on and create our first CI pipeline, there is still an important point to talk about: we didn’t create any table in the database, so how does the application work? Let’s have a look at our database with a terminal:
# Connect to the database (use your new root password)
mysql -u root -p
The command above opens a prompt; please enter the following instructions:
-- Use our database
USE todolist;

-- Display the tables
SHOW TABLES;
The last command should display something like this:
+-----------------------+
| Tables_in_todolist    |
+-----------------------+
| flyway_schema_history |
| task                  |
+-----------------------+
2 rows in set (0.00 sec)
Now we can understand why the application works: because the database schema has been created. The “task” table corresponds to the Java class “src/main/java/com/alibaba/intl/todolist/model/Task.java”. Let’s study “flyway_schema_history”:
-- Look at the content of the flyway_schema_history table
SELECT * FROM flyway_schema_history;
The result should look like this:
+----------------+---------+-------------------+------+-----------------------------+------------+--------------+---------------------+----------------+---------+
| installed_rank | version | description       | type | script                      | checksum   | installed_by | installed_on        | execution_time | success |
+----------------+---------+-------------------+------+-----------------------------+------------+--------------+---------------------+----------------+---------+
|              1 | 001     | Create task table | SQL  | V001__Create_task_table.sql | -947603613 | todolist     | 2018-10-31 17:57:51 |             24 |       1 |
+----------------+---------+-------------------+------+-----------------------------+------------+--------------+---------------------+----------------+---------+
1 row in set (0.00 sec)
The “flyway_schema_history” table has been created by Flyway, a tool that allows us to create and update our database schema. As you can see, the table contains the names of the scripts from “src/main/resources/db/migration” that have been successfully executed.
Working with Flyway requires us to follow this procedure:
- During the development of the application, when we want to upgrade our database schema, we need to add a new script in the “src/main/resources/db/migration” folder with a higher prefix number (we cannot modify existing scripts);
- When Flyway starts, it checks what are the scripts that have been already executed (thanks to the “flyway_schema_history” table), and run the new ones.
Flyway is automatically started when the applications starts, if you check the application logs, you can see that Spring calls Flyway during its initialization. For more information about this integration, please read the official documentation.
Commit and first CI pipeline
It is now time to save the project in the git repository. Please enter the following command in your terminal:
# Go to the project folder
cd ~/projects/todolist

# Check files to commit
git status
The last command should print something like this:
On branch master

No commits yet

Untracked files:
  (use "git add <file>..." to include in what will be committed)

	.gitignore
	.gitlab-ci.yml
	package.json
	pom.xml
	src/
	webpack.config.js
Add all these files and commit them:
# Add the files
git add .gitignore .gitlab-ci.yml package.json pom.xml src/ webpack.config.js

# Commit the files and write a comment
git commit -m "Initial commit."

# Push the commit to the GitLab server
git push origin master
Pushing your code to GitLab triggers something interesting:
- Open GitLab in your web browser (the URL must be like https://gitlab.my-sample-domain.xyz/);
- Click on the “Projects” item in the top menu and select “Your projects”;
- Click on the “todolist” project; You should be able to see your files;
- Click in the “CI / CD” item in the left menu and select “Pipelines”;
You should see something like this:

Clicking on the “Artifacts” button on the left allows you to download the generated “.jar” file containing your ready-for-production application.
Clicking on the icon in the “Stages” column and then selecting “build” allows you to see the commands and logs used to compile and package the application.
This pipeline is triggered when somebody pushes code to the server. It is configured by the “.gitlab-ci.yml” file:
image: maven:3.6.0-jdk-8

variables:
  MAVEN_OPTS: "-Dmaven.repo.local=./.m2/repository"

cache:
  paths:
    - ./.m2/repository

stages:
  - build

build:
  stage: build
  script: "mvn package"
  artifacts:
    paths:
      - target/*.jar
The first line “image: maven:3.6.0-jdk-8” defines the Docker image used to execute the build command (as you can see, using Docker relieves us to setup the JDK 8 and Maven on the GitLab runner manually).
The “MAVEN_OPTS” variable and the “cache” block are an optimization: because Maven takes a lot of time to download dependencies, these definitions allow us to re-use these dependencies among pipelines.
The “stages” block defines only one stage “build”, we will add new ones later in this tutorial.
The “build” block is the most important one: it instructs the GitLab runner to execute “mvn package” in order to compile, run the tests and package the application. The “artifacts” block instructs GitLab to save the generated “.jar” file.
Note: even if this pipeline is simple, it is already quite useful for a team since it can immediately inform the team that somebody committed something bad (for example he missed a file, or some test fail unexpectedly). GitLab automatically sends an email to the person who made the mistake: this rapid feedback can save us a lot of time because the error cause has a great chance to be located in the code that we just modified.