DevOps for small / medium web apps - Part 5 - HTTPS configuration
Summary
- Introduction
- Architecture
- SLB configuration
- Certificate manager
- Pre-production and production environments
Introduction
HTTPS is now a requirement for any professional website that needs to receive input from users, as it prevents man-in-the-middle and eavesdropping attacks.
There are several ways to configure HTTPS for our sample application, the easiest one is to buy a SSL/TLS certificate and upload it on the SLB. However we will choose a more complex approach by using SSL/TLS certificates from Let’s Encrypt.
“Let’s Encrypt” is a certificate authority founded by organizations such as the Electronic Frontier Foundation, the Mozilla Foundation and Cisco Systems. The advantages are that it’s free and 100% automated, the main disadvantage is that it only provides Domain-Validated certificates (no Organization Validation nor Extended Validation), which is enough for many use cases.
Architecture
HTTPS works by encrypting HTTP traffic via the TLS protocol. In order to configure HTTPS, we first need to obtain a SSL/TLS certificate and configure it on our SLB (by adding a HTTPS listener).
Once configured, the SLB handles the HTTPS “complexities” and continues to communicate with backend servers via unencrypted HTTP. Thus, a typical HTTPS request works like this:
- A user opens a HTTPS connection with our web application;
- The SLB uses its configured SSL/TLS certificate to establish a secured connection;
- The user sends a HTTPS request;
- The SLB converts the HTTPS request into a HTTP one (unencrypted) and sends it to one of the backend servers;
- The backend server receives the HTTP request and sends back a HTTP response;
- The SLB converts the HTTP response into a HTTPS one (encrypted) and sends it to the user.
Configuring a HTTPS listener for our SLB is relatively easy (we will add a alicloud_slb_server_certificate and a new alicloud_slb_listener in our Terraform script). Unfortunately obtaining a SSL/TLS certificate from Let’s Encrypt requires us to modify our architecture:
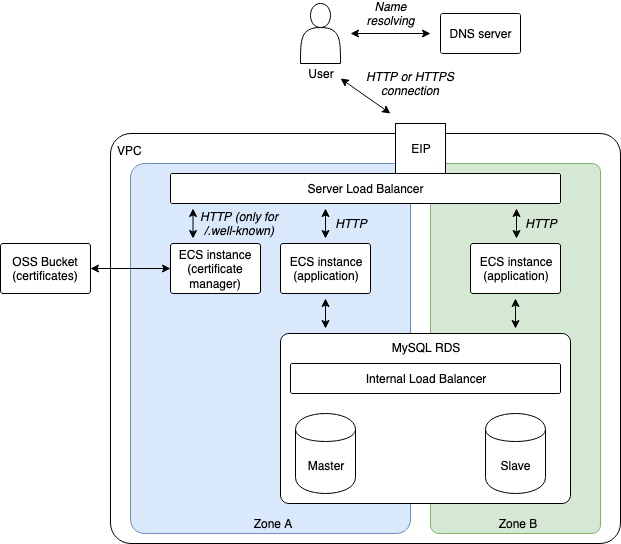
Let’s Encrypt needs a way to automatically check that our domain name belongs to us before providing us a certificate. For that we need to setup a program called certbot on our system, then execute this application so that it cans communicate with Let’s Encrypt servers, run a challenge and obtain the certificate. There are several types of challenges, we will use the HTTP-01 one and include it in the following process:
- Create a new ECS instance named “certificate manager” and configure the SLB via a slb_rule so that every HTTP request with an URL that starts with “http://dev.my-sample-domain.xyz/.well-known/” is forwarded to this new ECS instance.
- On this new ECS instance, install certbot and Nginx, then configure the later to serve files from “/var/www/html/certman/.well-known/” on the port 8080 (we keep this port in order to re-use the application security group; the SLB will redirect internet traffic to this port).
- Execute Certbot like this:
certbot certonly --webroot -w /var/www/html/certman/.well-known/ -d dev.my-sample-domain.xyzThis command runs the “HTTP-01” challenge by executing the following steps:
- Certbot creates a file with a unique name in the folder “/var/www/html/certman/.well-known/acme-challenge/”, so that Nginx cans serve this file when the URL path is “/.well-known/acme-challenge/unique-name”;
- Certbot contacts a Let’s Encrypt server and asks it the to make a HTTP request to this file with the URL “http://dev.my-sample-domain.xyz/.well-known/acme-challenge/unique-name”;
- The Let’s Encrypt server tries to download this file; if it succeeds it means that we indeed own the domain name so the challenge is passed with success.
Once the challenge is passed, the Let’s Encrypt server generates a SSL/TLS certificate and sends it to certbot, which then stores it in the PEM format in the folder “/etc/letsencrypt/live/dev.my-sample-domain.xyz/”.
Note: beware that Let’s Encrypt has rate limits, so we should take care to run certbot only when necessary. This is the reason why we use an OSS bucket: we store SSL/TLS certificates there and only query Let’s Encrypt when they are going to expire.
SLB configuration
Let’s start by adding a listener to our SLB in order to let it manage HTTPS connections. For that we will generate a temporary self-signed certificate and update our Terraform script.
Note 1: the complete project files with the modifications of this tutorial part are available in the “sample-app/version4” folder.
Note 2: although we generate a self-signed certificate now, it is later replaced by a real one by the Certificate Manager. The self-signed certificate is only used during the Terraform step, as we cannot create the necessary cloud resources for the Certificate Manager without it.
Open “gitlab-ci-scripts/deploy/build_basis_infra.sh” and insert the following block before
# Set values for Terraform variables:
# Generate SSL/TLS certificate if it doesn't exist
export CERT_FOLDER_PATH=${BUCKET_LOCAL_PATH}/certificate/${ENV_NAME}/selfsigned
export CERT_PUBLIC_KEY_PATH=${CERT_FOLDER_PATH}/public.crt
export CERT_PRIVATE_KEY_PATH=${CERT_FOLDER_PATH}/private.key

mkdir -p ${CERT_FOLDER_PATH}
if [[ ! -f ${CERT_PUBLIC_KEY_PATH} ]]; then
  openssl req -x509 -nodes -days 365 -newkey rsa:2048 \
    -keyout ${CERT_PRIVATE_KEY_PATH} \
    -out ${CERT_PUBLIC_KEY_PATH} \
    -subj "/C=CN/ST=Zhejiang/L=Hangzhou/O=Alibaba Cloud/OU=Project Delivery/CN=${SUB_DOMAIN_NAME}.${DOMAIN_NAME}"
fi
As you can see, we use OpenSSL to generate the certificate that we store on the OSS bucket. The certificate is composed of a public key “public.crt” and a private key “private.key”. They are all in the PEM format.
We then create two new Terraform variables at the end of “infrastructure/05_vpc_slb_eip_domain/variables.tf”:
variable "certificate_public_key_path" {
  description = "Path to the public key of the SSL/TLS certificate."
}

variable "certificate_private_key_path" {
  description = "Path to the private key of the SSL/TLS certificate."
}
Then we modify the script “gitlab-ci-scripts/deploy/build_basis_infra.sh” again by adding the following lines under
export TF_VAR_sub_domain_name=${SUB_DOMAIN_NAME}:
export TF_VAR_certificate_public_key_path=${CERT_PUBLIC_KEY_PATH}
export TF_VAR_certificate_private_key_path=${CERT_PRIVATE_KEY_PATH}
Finally, we add the resources alicloud_slb_server_certificate and alicloud_slb_listener into
“infrastructure/05_vpc_slb_eip_domain/main.tf”:
// ...
// Server load balancer
resource "alicloud_slb" "app_slb" {
  // ...
}

// SLB server certificate
resource "alicloud_slb_server_certificate" "app_slb_certificate" {
  name = "sample-app-slb-certificate-self-${var.env}"
  server_certificate = "${file(var.certificate_public_key_path)}"
  private_key = "${file(var.certificate_private_key_path)}"
}

// SLB listeners
resource "alicloud_slb_listener" "app_slb_listener_http" {
  // ...
}
resource "alicloud_slb_listener" "app_slb_listener_https" {
  load_balancer_id = "${alicloud_slb.app_slb.id}"

  backend_port = 8080
  frontend_port = 443
  bandwidth = -1
  protocol = "https"
  ssl_certificate_id = "${alicloud_slb_server_certificate.app_slb_certificate.id}"
  tls_cipher_policy = "tls_cipher_policy_1_0"

  health_check = "on"
  health_check_type = "http"
  health_check_connect_port = 8080
  health_check_uri = "/health"
  health_check_http_code = "http_2xx"
}

// EIP
// ...
Note 0: an SLB can manage two types of certificate resources: server certificates and CA certificates. We only deal with the first type (the second type can be used to authenticate users with client certificates).
Note 1: the HTTPS listener is very similar to the HTTP one, the main differences are the frontend port (443 instead
of 80) and the presence of the ssl_certificate_id.
Commit and push these changes to GitLab:
# Go to the project folder
cd ~/projects/todolist

# Check files to commit
git status

# Add the modified and new files
git add gitlab-ci-scripts/deploy/build_basis_infra.sh
git add infrastructure/05_vpc_slb_eip_domain/variables.tf
git add infrastructure/05_vpc_slb_eip_domain/main.tf

# Commit and push to GitLab
git commit -m "Add a SLB HTTPS listener."
git push origin master
Check your CI / CD pipeline on GitLab, in particularly the logs of the “deploy” stage and make sure there is no error.
You can then test the results from your computer with the following command:
# Check that the SLB is configured to accept HTTPS requests
curl https://dev.my-sample-domain.xyz/
The curl command should fail with the following error:
curl: (60) SSL certificate problem: self signed certificate
More details here: https://curl.haxx.se/docs/sslcerts.html

curl performs SSL certificate verification by default, using a "bundle"
 of Certificate Authority (CA) public keys (CA certs). If the default
 bundle file isn't adequate, you can specify an alternate file
 using the --cacert option.
If this HTTPS server uses a certificate signed by a CA represented in
 the bundle, the certificate verification probably failed due to a
 problem with the certificate (it might be expired, or the name might
 not match the domain name in the URL).
If you'd like to turn off curl's verification of the certificate, use
 the -k (or --insecure) option.
HTTPS-proxy has similar options --proxy-cacert and --proxy-insecure.
Which is normal because self-signed certificates are considered insecure (a hacker performing a man-in-the-middle attack can generate its own self-signed certificate), but it validates that our SLB listener is configured for HTTPS.
Note: we can force curl to accept our self-signed certificate with the following command:
# Force curl to accept our self-signed certificate
curl -k https://dev.my-sample-domain.xyz/
The curl command should output something like this:
<!DOCTYPE html>
<html>
<head>
    <meta charset="utf-8">
    <title>To-Do list</title>
    <link rel="stylesheet" href="css/index.css" media="screen">
</head>
<body>
<div id="react"></div>
<script src="built/bundle.js"></script>
</body>
</html>
Certificate manager
VM image
Let’s setup our “Certificate Manager” so that we can get a proper certificate from Let’s Encrypt.
The first step is to create the VM image for the ECS instance that will manage our certificate. Open a terminal and execute the following instructions:
# Go to the project folder
cd ~/projects/todolist

# Create the folder that will contain the new scripts
mkdir -p infrastructure/15_certman/05_image
cd infrastructure/15_certman/05_image

# Copy the Terraform scripts that allow us to extract info about our Alibaba Cloud region
cp ../../10_webapp/10_image/variables.tf .
cp ../../10_webapp/10_image/main.tf .
cp ../../10_webapp/10_image/output.tf .

# Create a resources folder for scripts we want to include into the image
mkdir resources
The “Certificate Manager” needs the following configuration in order to obtain a certificate and update the SLB HTTPS listener configuration:
- Nginx must be installed and configured to serve files from the “/var/www/html/certman/.well-known/” folder;
- Nginx must also responds “OK” when the SLB health check system queries its “/health”;
- OSSFS must be installed and configured to allow the certificate to be stored on our OSS bucket (the goal is to avoid reaching Let’s Encrypt rate limits);
- Certbot must be installed and called via a Python script that will regularly check whether the current certificate is up to date, renew it when necessary and update the SLB HTTPS listener configuration.
The Packer script will become quite large so we will write it step by step. Let’s start with Nginx installation and configuration. Enter the following command in your terminal:
# Create the packer script
nano certman_image.json
Enter the following content into the new file:
{
  "variables": {
    "access_key": "{{env `ALICLOUD_ACCESS_KEY`}}",
    "secret_key": "{{env `ALICLOUD_SECRET_KEY`}}",
    "region_id": "{{env `ALICLOUD_REGION`}}",
    "source_image": "{{env `SOURCE_IMAGE`}}",
    "image_version": "{{env `IMAGE_VERSION`}}",
    "instance_type": "{{env `INSTANCE_TYPE`}}",
    "environment": "{{env `ENVIRONMENT`}}"
  },
  "builders": [
    {
      "type": "alicloud-ecs",
      "access_key": "{{user `access_key`}}",
      "secret_key": "{{user `secret_key`}}",
      "region": "{{user `region_id`}}",
      "image_name": "sample-app-certman-image-{{user `environment`}}-{{user `image_version`}}",
      "image_description": "Certificate manager ({{user `environment`}} environment).",
      "image_version": "{{user `image_version`}}",
      "source_image": "{{user `source_image`}}",
      "ssh_username": "root",
      "instance_type": "{{user `instance_type`}}",
      "io_optimized": "true",
      "internet_charge_type": "PayByTraffic",
      "image_force_delete": "true",
      "system_disk_mapping": {
        "disk_category": "cloud_ssd",
        "disk_size": 20
      }
    }
  ],
  "provisioners": [
    {
      "type": "shell",
      "inline": [
        "export DEBIAN_FRONTEND=noninteractive",
        "apt-get -y update",
        "apt-get -y upgrade",
        "apt-get -y install nginx",
        "mkdir -p /var/www/html/certman/.well-known/acme-challenge",
        "echo \"OK\" > /var/www/html/certman/health",
        "echo \"It works!\" > /var/www/html/certman/.well-known/index.html",
        "echo \"It works!\" > /var/www/html/certman/.well-known/acme-challenge/index.html"
      ],
      "pause_before": "30s"
    },
    {
      "type": "file",
      "source": "resources/nginx-conf-certman",
      "destination": "/etc/nginx/sites-available/certman"
    },
    {
      "type": "shell",
      "inline": [
        "ln -sf /etc/nginx/sites-available/certman /etc/nginx/sites-enabled/certman",
        "nginx -t",
        "systemctl enable nginx"
      ]
    }
  ]
}
This script executes the following actions:
- Update the default Ubuntu installation and install Nginx;
- Create the folders and files that will be used to respond to HTTP requests for “/health” and “/.well-known/”;
- Upload a Nginx configuration file (we will create it in a moment, see below);
- Activate the uploaded configuration and configure SystemD to automatically start Nginx when the machine starts.
Save and quit by pressing CTRL+X, then create the Nginx configuration file:
# Create the Nginx configuration file
nano resources/nginx-conf-certman
Enter the following content into the new file:
server {
        listen 8080 default_server;
        listen [::]:8080 default_server;

        root /var/www/html/certman;

        index index.html index.htm index.nginx-debian.html;

        server_name _;

        location / {
                try_files $uri $uri/ =404;
        }
}
The most interesting parts of this file are the listening port (8080, the same as our application in order to reuse our existing configuration) and the root folder “/var/www/html/certman” (were we have already created the “health” file and “.well-known” folder).
Save and quit by pressing CTRL+X. Now let’s extend our Packer script:
# Edit the packer script
nano certman_image.json
Edit the content with the following changes:
{
  "variables": {
    // ...
    "ossfs_version": "{{env `OSSFS_VERSION`}}",
    "bucket_name": "{{env `BUCKET_NAME`}}",
    "bucket_endpoint": "{{env `BUCKET_ENDPOINT`}}"
  },
  // ...
  "provisioners": [
    // ...
    {
      "type": "file",
      "source": "resources/ossfs.service",
      "destination": "/etc/systemd/system/ossfs.service"
    },
    {
      "type": "shell",
      "inline": [
        "export OSSFS_VERSION=\"{{user `ossfs_version`}}\"",
        "export ALICLOUD_ACCESS_KEY=\"{{user `access_key`}}\"",
        "export ALICLOUD_SECRET_KEY=\"{{user `secret_key`}}\"",
        "export BUCKET_NAME=\"{{user `bucket_name`}}\"",
        "export BUCKET_ENDPOINT=\"{{user `bucket_endpoint`}}\"",
        "export DEBIAN_FRONTEND=noninteractive",
        "apt-get -y install gdebi-core wget",
        "cd /tmp",
        "wget \"https://github.com/aliyun/ossfs/releases/download/v${OSSFS_VERSION}/ossfs_${OSSFS_VERSION}_ubuntu16.04_amd64.deb\"",
        "gdebi -n \"ossfs_${OSSFS_VERSION}_ubuntu16.04_amd64.deb\"",
        "echo \"$BUCKET_NAME:$ALICLOUD_ACCESS_KEY:$ALICLOUD_SECRET_KEY\" > /etc/passwd-ossfs",
        "chmod 640 /etc/passwd-ossfs",
        "mkdir -p /mnt/oss_bucket",
        "export ESCAPED_BUCKET_NAME=$(echo $BUCKET_NAME | sed -e 's/\\\\/\\\\\\\\/g; s/\\//\\\\\\//g; s/&/\\\\\\&/g')",
        "export ESCAPED_BUCKET_ENDPOINT=$(echo $BUCKET_ENDPOINT | sed -e 's/\\\\/\\\\\\\\/g; s/\\//\\\\\\//g; s/&/\\\\\\&/g')",
        "sed -i \"s/%BUCKET_NAME%/${ESCAPED_BUCKET_NAME}/\" /etc/systemd/system/ossfs.service",
        "sed -i \"s/%BUCKET_ENDPOINT%/${ESCAPED_BUCKET_ENDPOINT}/\" /etc/systemd/system/ossfs.service",
        "systemctl enable ossfs.service"
      ]
    }
  ]
}
This addition adds two provisioners that:
- Upload a SystemD file “ossfs.service” (see below);
- Install OSSFS, configure it and configure SystemD to start OSSFS when the machine boots.
Save and close by pressing CTRL+X, then create the SystemD file:
# Create the SystemD configuration file for OSSFS
nano resources/ossfs.service
Copy the following content to this new file:
[Unit]
Description=ossfs
After=syslog.target
After=network.target

[Service]
Type=oneshot
RemainAfterExit=yes
ExecStart=/usr/local/bin/ossfs %BUCKET_NAME% /mnt/oss_bucket -ourl=%BUCKET_ENDPOINT%
ExecStop=/bin/umount /mnt/oss_bucket
StandardOutput=syslog
StandardError=syslog
SyslogIdentifier=ossfs

[Install]
WantedBy=multi-user.target
The most important part of this file is the ExecStart property: it mounts our OSS bucket in “/mnt/oss_bucket” (note:
the %BUCKET_NAME% and %BUCKET_ENDPOINT% placeholders are replaced by using
sed in the Packer script).
Save and close the file with CTRL+X. Let’s continue with the certbot installation and our certificate update script:
# Edit the packer script
nano certman_image.json
Edit the content with the following changes:
{
  "variables": {
    // ...
    "domain": "{{env `DOMAIN_NAME`}}",
    "sub_domain": "{{env `SUB_DOMAIN_NAME`}}",
    "email_address": "{{env `EMAIL_ADDRESS`}}",
    "aliyun_python_sdk_core_version": "2.11.1",
    "aliyun_python_sdk_slb_version": "3.2.7"
  },
  // ...
  "provisioners": [
    // ...
    {
      "type": "shell",
      "inline": [
        "mkdir -p /etc/certificate-updater/",
        "mkdir -p /opt/certificate-updater/"
      ]
    },
    {
      "type": "file",
      "source": "resources/certificate-updater-config.ini",
      "destination": "/etc/certificate-updater/config.ini"
    },
    {
      "type": "file",
      "source": "resources/certificate-updater.py",
      "destination": "/opt/certificate-updater/certificate-updater.py"
    },
    {
      "type": "file",
      "source": "resources/certificate-manager.sh",
      "destination": "/opt/certificate-updater/certificate-updater.sh"
    },
    {
      "type": "file",
      "source": "resources/certificate-updater.service",
      "destination": "/etc/systemd/system/certificate-updater.service"
    },
    {
      "type": "file",
      "source": "resources/certificate-updater-cron",
      "destination": "/etc/cron.d/certificate-updater"
    },
    {
      "type": "shell",
      "inline": [
        "export DEBIAN_FRONTEND=noninteractive",
        "export ALICLOUD_ACCESS_KEY=\"{{user `access_key`}}\"",
        "export ALICLOUD_SECRET_KEY=\"{{user `secret_key`}}\"",
        "export ALICLOUD_REGION=\"{{user `region_id`}}\"",
        "export ENVIRONMENT=\"{{user `environment`}}\"",
        "export DOMAIN=\"{{user `domain`}}\"",
        "export SUB_DOMAIN=\"{{user `sub_domain`}}\"",
        "export EMAIL_ADDRESS=\"{{user `email_address`}}\"",
        "apt-get -y install software-properties-common",
        "add-apt-repository -y ppa:certbot/certbot",
        "apt-get -y update",
        "apt-get -y install python-certbot-nginx",
        "cd /opt/certificate-updater",
        "pip install pipenv --upgrade",
        "pipenv install aliyun-python-sdk-core==${ALIYUN_PYTHON_SDK_CORE_VERSION}",
        "pipenv install aliyun-python-sdk-slb==${ALIYUN_PYTHON_SDK_SLB_VERSION}",
        "pipenv install pyopenssl",
        "pipenv install pytz",
        "export ESCAPED_ACCESS_KEY=$(echo $ALICLOUD_ACCESS_KEY | sed -e 's/\\\\/\\\\\\\\/g; s/\\//\\\\\\//g; s/&/\\\\\\&/g')",
        "export ESCAPED_SECRET_KEY=$(echo $ALICLOUD_SECRET_KEY | sed -e 's/\\\\/\\\\\\\\/g; s/\\//\\\\\\//g; s/&/\\\\\\&/g')",
        "export ESCAPED_REGION=$(echo $ALICLOUD_REGION | sed -e 's/\\\\/\\\\\\\\/g; s/\\//\\\\\\//g; s/&/\\\\\\&/g')",
        "export ESCAPED_ENVIRONMENT=$(echo $ENVIRONMENT | sed -e 's/\\\\/\\\\\\\\/g; s/\\//\\\\\\//g; s/&/\\\\\\&/g')",
        "export ESCAPED_DOMAIN=$(echo $DOMAIN | sed -e 's/\\\\/\\\\\\\\/g; s/\\//\\\\\\//g; s/&/\\\\\\&/g')",
        "export ESCAPED_SUB_DOMAIN=$(echo $SUB_DOMAIN | sed -e 's/\\\\/\\\\\\\\/g; s/\\//\\\\\\//g; s/&/\\\\\\&/g')",
        "export ESCAPED_EMAIL_ADDRESS=$(echo $EMAIL_ADDRESS | sed -e 's/\\\\/\\\\\\\\/g; s/\\//\\\\\\//g; s/&/\\\\\\&/g')",
        "sed -i \"s/%access-key-id%/${ESCAPED_ACCESS_KEY}/\" /etc/certificate-updater/config.ini",
        "sed -i \"s/%access-key-secret%/${ESCAPED_SECRET_KEY}/\" /etc/certificate-updater/config.ini",
        "sed -i \"s/%region-id%/${ESCAPED_REGION}/\" /etc/certificate-updater/config.ini",
        "sed -i \"s/%environment%/${ESCAPED_ENVIRONMENT}/\" /etc/certificate-updater/config.ini",
        "sed -i \"s/%domain%/${ESCAPED_DOMAIN}/\" /etc/certificate-updater/config.ini",
        "sed -i \"s/%sub-domain%/${ESCAPED_SUB_DOMAIN}/\" /etc/certificate-updater/config.ini",
        "sed -i \"s/%email-address%/${ESCAPED_EMAIL_ADDRESS}/\" /etc/certificate-updater/config.ini",
        "chmod +x /opt/certificate-updater/certificate-updater.sh",
        "systemctl enable certificate-updater.service"
      ]
    }
  ]
}
As you can see we are adding a new variable “email_address” that we will need to add in the GitLab configuration, it must contain an email address where we want to receive messages from Let’s Encrypt when our certificate is going to expire.
We are also uploading many new files:
- certificate-updater.py - a script written in Python that checks whether the current certificate it up to date, renews it if necessary, and changes the SLB configuration;
- certificate-updater.sh - a Bash script that sets the correct working directory and then calls certificate-updater.py;
- certificate-updater-config.ini - the configuration file for “certificate-updater.py”;
- certificate-updater.service - a SystemD script to execute “certificate-updater.py” when the VM starts;
- certificate-updater-cron - a Cron script to run “certificate-updater.py” periodically.
The last provisioner installs certbot and libraries for our Python script, updates the Python script configuration, and configures SystemD to start OSSFS when the machine boots.
Note: you might have remarked that we install Python packages with pipenv, but not with pip. The reason behind this decision is that we need to create a separate virtual environment for our script as a workaround: there are other Python scripts injected in each ECS instance called “cloud-init”. These cloud-init scripts set things such as the hostname, password, …etc. Unfortunately the packages needed for our Python script are incompatible with the ones needed by the cloud-init scripts, so we need to separate environments.
Save with CTRL+X, then create the Python script configuration file:
# Create the configuration file for the Python script
nano resources/certificate-updater-config.ini
Put the following content into this file:
#
# Configuration file file for certificate-updater.
#
# This file must be located at /etc/certificate-updater/config.ini
#

[AlibabaCloud]
AccessKeyId : %access-key-id%
AccessKeySecret : %access-key-secret%
RegionId : %region-id%

[Environment]
# Environment (dev, pre-prod, prod)
Environment : %environment%

# Main domain name
Domain : %domain%

# Sub-domain name (dev, pre-prod, www)
SubDomain : %sub-domain%

# Email address of the person to warn when the certificate will expire soon
EmailAddress : %email-address%
The content is straight forward; the placeholders are replaced with sed in the Packer script.
Save with CTRL+X and create the Python script:
# Create the Python script
nano resources/certificate-updater.py
Enter the following content into the file:
#!/usr/bin/env python
# coding=utf-8

import ConfigParser
import OpenSSL
import glob
import json
import os
import pytz
import shutil
import subprocess
from aliyunsdkcore.client import AcsClient
from aliyunsdkcore.request import CommonRequest
from datetime import datetime
from datetime import timedelta

# Read the configuration
config = ConfigParser.ConfigParser()
config.read("/etc/certificate-updater/config.ini")

accessKeyId = config.get("AlibabaCloud", "AccessKeyId")
accessKeySecret = config.get("AlibabaCloud", "AccessKeySecret")
regionId = config.get("AlibabaCloud", "RegionId")
environment = config.get("Environment", "Environment")
domain = config.get("Environment", "Domain")
subDomain = config.get("Environment", "SubDomain")
emailAddress = config.get("Environment", "EmailAddress")

print("Certificate Updater started (environment: " + environment + ", " +
      "domain: " + domain + ", sub-domain: " + subDomain + ", email address: " + emailAddress + ")")

# Check if we need to run certbot
certFolderPath = "/mnt/oss_bucket/certificate/" + environment + "/letsencrypt"
publicKeyPath = certFolderPath + "/cert.pem"
privateKeyPath = certFolderPath + "/privkey.pem"
certbotCertFolderPath = "/etc/letsencrypt/live/" + subDomain + "." + domain

publicKeyExists = os.path.exists(publicKeyPath)
privateKeyExists = os.path.exists(privateKeyPath)
certExpireSoon = False

if publicKeyExists:
    publicKey = open(publicKeyPath, "rt").read()
    x509 = OpenSSL.crypto.load_certificate(OpenSSL.crypto.FILETYPE_PEM, publicKey)
    expirationDate = datetime.strptime(x509.get_notAfter(), "%Y%m%d%H%M%SZ").replace(tzinfo=pytz.UTC)
    now = datetime.now(pytz.utc)
    certExpireSoon = now + timedelta(weeks=1) > expirationDate

runCertBot = not publicKeyExists or not privateKeyExists or certExpireSoon

certbotCronConfigured = not os.path.exists("/etc/cron.d/certbot")
print("Let's Encrypt certificate status:")
print("    publicKeyPath           = %s" % publicKeyPath)
print("    privateKeyPath          = %s" % privateKeyPath)
print("    publicKeyExists         = %s" % publicKeyExists)
print("    privateKeyExists        = %s" % privateKeyExists)
print("    certExpireSoon          = %s" % certExpireSoon)
print("    certbotCronConfigured   = %s" % certbotCronConfigured)
print("    runCertBot              = %s" % runCertBot)

# Run certbot if necessary
if runCertBot:
    print("Executing certbot...")
    returnCode = subprocess.call(
        "certbot certonly --webroot -w /var/www/html/certman/ -d \"%s.%s\" --non-interactive "
        "--agree-tos --email \"%s\"" % (subDomain, domain, emailAddress), shell=True)
    if returnCode != 0:
        print("Unable to run certbot, quitting...")
        quit(1)

    print("Replace the certificate on the OSS bucket...")
    if not os.path.exists(certFolderPath):
        os.makedirs(certFolderPath)
    for f in glob.glob(certFolderPath + "/*"):
        os.remove(f)
    for f in glob.glob(certbotCertFolderPath + "/*"):
        shutil.copy2(f, certFolderPath + "/")

# Check if the SLB certificate needs to be updated
print("Getting information about the SLB sample-app-slb-" + environment + "...")
client = AcsClient(accessKeyId, accessKeySecret, regionId)
request = CommonRequest()
request.set_accept_format("json")
request.set_domain("slb.aliyuncs.com")
request.set_method("POST")
request.set_version("2014-05-15")
request.set_action_name("DescribeLoadBalancers")
request.add_query_param("LoadBalancerName", "sample-app-slb-" + environment)
request.add_query_param("RegionId", regionId)
jsonResponse = client.do_action_with_exception(request)
response = json.loads(jsonResponse)
if response["TotalCount"] != 1:
    print("Unable to find the SLB. Response:")
    print(response)
    quit(1)
slbInfo = response["LoadBalancers"]["LoadBalancer"][0]
slbId = slbInfo["LoadBalancerId"]

print("SLB found: %s. Loading HTTPS listener information..." % slbId)
request = CommonRequest()
request.set_accept_format("json")
request.set_domain("slb.aliyuncs.com")
request.set_method("POST")
request.set_version("2014-05-15")
request.set_action_name("DescribeLoadBalancerHTTPSListenerAttribute")
request.add_query_param("ListenerPort", "443")
request.add_query_param("LoadBalancerId", slbId)
jsonResponse = client.do_action_with_exception(request)
response = json.loads(jsonResponse)
if "ServerCertificateId" not in response:
    print("Unable to find the SLB HTTPS certificate. Response:")
    print(response)
    quit(1)
slbCertId = response["ServerCertificateId"]

print("SLB HTTPS listener information found. Loading information about the certificate " + slbCertId + "...")
request = CommonRequest()
request.set_accept_format("json")
request.set_domain("slb.aliyuncs.com")
request.set_method("POST")
request.set_version("2014-05-15")
request.set_action_name("DescribeServerCertificates")
request.add_query_param("RegionId", regionId)
request.add_query_param("ServerCertificateId", slbCertId)
jsonResponse = client.do_action_with_exception(request)
response = json.loads(jsonResponse)
if not response["ServerCertificates"]["ServerCertificate"]:
    print("Unable to find the certificate " + slbCertId + ". Response:")
    print(response)
    quit(1)
slbCertInfo = response["ServerCertificates"]["ServerCertificate"][0]
slbCertFingerprint = slbCertInfo["Fingerprint"].upper()

# Compute the fingerprint of the current certificate from Let's Encrypt
print("Computing the Let's Encrypt certificate fingerprint...")
publicKey = open(publicKeyPath, "rt").read()
x509 = OpenSSL.crypto.load_certificate(OpenSSL.crypto.FILETYPE_PEM, publicKey)
certFingerprint = x509.digest("sha1")

# Check if the SLB listener certificate needs to be updated
updateListenerCert = slbCertFingerprint != certFingerprint
print("Certificates information:")
print("    slbCertFingerprint = %s" % slbCertFingerprint)
print("    certFingerprint    = %s" % certFingerprint)
print("    updateListenerCert = %s" % updateListenerCert)

if not updateListenerCert:
    print("SLB listener certificate is up to date.")
    quit(0)

# Upload the SLB listener certificate
now = datetime.now()
certName = "sample-app-slb-certificate-" + environment + "-" + now.strftime("%Y%m%d%H%M%S")
print("Upload the Let's Encrypt certificate " + certName + "...")
request = CommonRequest()
request.set_accept_format("json")
request.set_domain("slb.aliyuncs.com")
request.set_method("POST")
request.set_version("2014-05-15")
request.set_action_name("UploadServerCertificate")
privateKey = open(privateKeyPath, "rt").read()
privateKey = privateKey.replace("BEGIN PRIVATE", "BEGIN RSA PRIVATE")
privateKey = privateKey.replace("END PRIVATE", "END RSA PRIVATE")
request.add_query_param("ServerCertificate", publicKey)
request.add_query_param("PrivateKey", privateKey)
request.add_query_param("ServerCertificateName", certName)
jsonResponse = client.do_action_with_exception(request)
response = json.loads(jsonResponse)
if not response["ServerCertificateId"]:
    print("Unable to upload the certificate " + certName + ". Response:")
    print(response)
    quit(1)
certId = response["ServerCertificateId"]

# Update the HTTPS listener with the new certificate
print("Certificate " + certName + " (id: " + certId + ") uploaded with success. Updating the HTTP listener...")
request = CommonRequest()
request.set_accept_format("json")
request.set_domain("slb.aliyuncs.com")
request.set_method("POST")
request.set_version("2014-05-15")
request.set_action_name("SetLoadBalancerHTTPSListenerAttribute")
request.add_query_param("ListenerPort", "443")
request.add_query_param("LoadBalancerId", slbId)
request.add_query_param("ServerCertificateId", certId)
jsonResponse = client.do_action_with_exception(request)
response = json.loads(jsonResponse)
if "Code" in response:
    print("Unable to update the SLB HTTPS certificate. Response:")
    print(response)
    quit(1)
print("SLB listener certificate updated with success.")
This script is quite long unfortunately, but it is easy to read. It executes the following operations:
- Read the configuration file;
- Check if a certificate already exists, and if yes check its expiration date;
- Run certbot if the certificate doesn’t exist or if it will be expired soon. The new certificate is stored into the OSS bucket;
- Get information about our SLB configuration thanks to Alibaba Cloud OpenAPI;
- Compare the SLB certificate fingerprint with the one we got with certbot, and stop the script here if they are equal;
- Upload the new certificate and update the SLB HTTPS listener configuration.
Save this file with CTRL+X and create the SystemD configuration file:
# Create the SystemD configuration file
nano resources/certificate-updater.service
Enter the following text into this file:
[Unit]
Description=certificate-updater
After=syslog.target
After=network.target
After=ossfs.service

[Service]
Type=simple
RemainAfterExit=yes
ExecStart=/usr/local/bin/pipenv run python2 /opt/certificate-updater/certificate-updater.py
StandardOutput=syslog
StandardError=syslog
SyslogIdentifier=certificate-updater
WorkingDirectory=/opt/certificate-updater

[Install]
WantedBy=multi-user.target
As you can see, this service will starts after we have mounted our OSS bucket. The ExecStart property run our script
with Python 2.7.
Save this file with CTRL+X and create the Cron configuration file:
# Create the Cron configuration file
nano resources/certificate-updater-cron
Write the following content:
#
# Execute the certificate updater.
#
SHELL=/bin/sh
PATH=/usr/local/sbin:/usr/local/bin:/sbin:/bin:/usr/sbin:/usr/bin

15 */12 * * * root systemd-cat -t "certificate-updater" /opt/certificate-updater/certificate-updater.sh
This file configures Cron to run “certificate-updater.sh” every day at 12h15 AM / PM. The console output is sent to syslog with the systemd-cat command.
Save this file with CTRL+X. The file “certificate-updater.sh” does only 2 things: set the right working directory for pipenv and invoke our Python script:
# Create the script that invokes the certificate updater
nano resources/certificate-manager.sh
Enter the following content:
#!/usr/bin/env bash
cd /opt/certificate-updater
/usr/local/bin/pipenv run python2 /opt/certificate-updater/certificate-updater.py
Save and quit by pressing CTRL+X.
Cloud resources
Now that we can generate an image, let’s create the ECS instance and other related cloud resources.
Open your terminal and execute:
# Go to the project folder
cd ~/projects/todolist

# Create the folder that will contain the new scripts
mkdir -p infrastructure/15_certman/10_ecs_slb_rule
cd infrastructure/15_certman/10_ecs_slb_rule

# Declare the variables for Terraform
nano variables.tf
Put the following content into this new file:
variable "env" {
  description = "Environment (dev, pre-prod, prod)"
  default = "dev"
}

variable "ecs_root_password" {
  description = "ECS root password (simpler to configure than key pairs)"
  default = "YourR00tP@ssword"
}
Save and close with CTRL+X, then continue with the main script:
# Create the main Terraform script
nano main.tf
The main script must contain the following code:
// Alibaba Cloud provider (source: https://github.com/terraform-providers/terraform-provider-alicloud)
provider "alicloud" {}

// Our custom certificate manager image
data "alicloud_images" "certman_images" {
  owners = "self"
  name_regex = "sample-app-certman-image-${var.env}"
  most_recent = true
}

// VSwitches in the first zone
data "alicloud_vswitches" "app_vswitches_zone_0" {
  name_regex = "sample-app-vswitch-zone-0-${var.env}"
}

// Security group
data "alicloud_security_groups" "app_security_groups" {
  name_regex = "sample-app-security-group-${var.env}"
}

// Load balancer
data "alicloud_slbs" "app_slbs" {
  name_regex = "sample-app-slb-${var.env}"
}

// Instance type with 1 vCPU, 0.5 GB or RAM
data "alicloud_instance_types" "instance_types_zone_0" {
  cpu_core_count = 1
  memory_size = 0.5
  availability_zone = "${data.alicloud_vswitches.app_vswitches_zone_0.vswitches.0.zone_id}"
  network_type = "Vpc"
}

// One ECS instance in the first availability zone
resource "alicloud_instance" "certman_ecs" {
  instance_name = "sample-app-certman-ecs-${var.env}"
  description = "Certificate manager (${var.env} environment)."

  host_name = "sample-app-certman-ecs-${var.env}"
  password = "${var.ecs_root_password}"

  image_id = "${data.alicloud_images.certman_images.images.0.id}"
  instance_type = "${data.alicloud_instance_types.instance_types_zone_0.instance_types.0.id}"

  internet_max_bandwidth_out = 1

  vswitch_id = "${data.alicloud_vswitches.app_vswitches_zone_0.vswitches.0.id}"
  security_groups = [
    "${data.alicloud_security_groups.app_security_groups.groups.0.id}"
  ]
}

// SLB VServer group
resource "alicloud_slb_server_group" "certman_server_group" {
  name = "sample-app-certman-slb-server-group-${var.env}"
  load_balancer_id = "${data.alicloud_slbs.app_slbs.slbs.0.id}"
  servers = [
    {
      server_ids = [
        "${alicloud_instance.certman_ecs.id}"
      ]
      port = 8080
      weight = 100
    }
  ]
}

// SLB forwarding rule
resource "alicloud_slb_rule" "rule" {
  name = "sample-app-certman-slb-rule-${var.env}"
  load_balancer_id = "${data.alicloud_slbs.app_slbs.slbs.0.id}"
  frontend_port = 80
  url = "/.well-known"
  server_group_id = "${alicloud_slb_server_group.certman_server_group.id}"
}
As you can see, this script creates an alicloud_instance resource based on our VM image. This ECS instance has a
public IP address (internet_max_bandwidth_out = 1); without it, the instance would not be able to connect to internet,
which is necessary for certbot.
Our SLB configuration is extended with a forwarding rule
(alicloud_slb_rule resource) that redirects HTTP requests with URLs that starts with “/.well-known” to our new
ECS instance. This redirection is made possible via a
VServer group (alicloud_slb_server_group resource).
Save and close this file with CTRL+X.
GitLab pipeline
Let’s integrate our new scripts to our GitLab pipeline. Let’s create a Bash script that calls Packer and Terraform:
# Go to the project folder
cd ~/projects/todolist

# Create a new pipeline script for the Certificate Manager
nano gitlab-ci-scripts/deploy/build_certman_infra.sh
Copy the following content into this new file:
#!/usr/bin/env bash
#
# Build the certificate manager infrastructure (RDS, VM image, ECS, ...)
#
# Required global variables:
#   - ALICLOUD_ACCESS_KEY
#   - ALICLOUD_SECRET_KEY
#   - ALICLOUD_REGION
#   - ENV_NAME
#   - DOMAIN_NAME
#   - SUB_DOMAIN_NAME
#   - EMAIL_ADDRESS
#   - ECS_ROOT_PASSWORD
#   - GITLAB_BUCKET_NAME
#   - GITLAB_BUCKET_ENDPOINT
#   - BUCKET_LOCAL_PATH
#   - CI_PIPELINE_IID
#   - OSSFS_VERSION
#

echo "Building the certificate manager infrastructure (environment: ${ENV_NAME}, region: ${ALICLOUD_REGION})..."

# Set values for Terraform and Packer variables
export TF_VAR_env=${ENV_NAME}
export TF_VAR_db_account_password=${DB_ACCOUNT_PASSWORD}
export TF_VAR_ecs_root_password=${ECS_ROOT_PASSWORD}

export IMAGE_VERSION=${CI_PIPELINE_IID}
export ENVIRONMENT=${ENV_NAME}
export BUCKET_NAME=${GITLAB_BUCKET_NAME}
export BUCKET_ENDPOINT=${GITLAB_BUCKET_ENDPOINT}

# Extract Alibaba Cloud information for building the application image
cd infrastructure/15_certman/05_image
export BUCKET_DIR_PATH="$BUCKET_LOCAL_PATH/infrastructure/$ENV_NAME/15_certman/05_image"
mkdir -p ${BUCKET_DIR_PATH}
cp ${BUCKET_DIR_PATH}/*.tfstate* .
terraform init -input=false
terraform apply -input=false -auto-approve
rm -f ${BUCKET_DIR_PATH}/*
cp *.tfstate* ${BUCKET_DIR_PATH}
export SOURCE_IMAGE=$(terraform output image_id)
export INSTANCE_TYPE=$(terraform output instance_type)

# Build the certificate manager image
packer build certman_image.json

# Create/update the ECS, SLB server group and forward rule
cd ../10_ecs_slb_rule
export BUCKET_DIR_PATH="$BUCKET_LOCAL_PATH/infrastructure/$ENV_NAME/15_certman/10_ecs_slb_rule"
mkdir -p ${BUCKET_DIR_PATH}
cp ${BUCKET_DIR_PATH}/*.tfstate* .
terraform init -input=false
terraform apply -input=false -auto-approve
rm -f ${BUCKET_DIR_PATH}/*
cp *.tfstate* ${BUCKET_DIR_PATH}

cd ../../..

echo "Certificate manager infrastructure successfully built (environment: ${ENV_NAME}, region: ${ALICLOUD_REGION})."
This script is composed of two main parts:
- Build the VM image (Terraform is used to obtain information from our Alibaba Cloud region);
- Create / update our cloud resources with Terraform.
Save this file with CTRL+X and edit “.gitlab-ci.yml”:
# Edit the GitLab pipeline definition
nano .gitlab-ci.yml
Add the following changes to “.gitlab-ci.yml”:
// ...
variables:
  // ...
  EMAIL_ADDRESS: "john.doe@example.org"
  // ...

// ...
deploy:
  // ...
  script:
    // ...
    - "./gitlab-ci-scripts/deploy/build_webapp_infra.sh"
    - "./gitlab-ci-scripts/deploy/build_certman_infra.sh"
    - "umount $BUCKET_LOCAL_PATH"
    // ...
  // ...
Only two lines need to be added:
- The new variable
EMAIL_ADDRESS; - A call to our new Bash script “./gitlab-ci-scripts/deploy/build_certman_infra.sh”.
Save your changes with CTRL+X.
Before we commit and push our modifications to GitLab, let’s first add the new variable in the GitLab pipeline configuration:
- Open GitLab (the URL must be like https://gitlab.my-sample-domain.xyz/);
- Sign in if necessary;
- Click on the “Projects” item in the top menu and select “Your projects”;
- Click on the “todolist” project;
- In the left menu select “Settings > CI/CD”;
- Expand the “Variables” panel, and create the following variable:
- EMAIL_ADDRESS = the email address where Let’s Encrypt will send messages when the certificate is going to expire.
- Click on “Save variables”;
We can now commit our new scripts:
# Check files to commit
git status

# Add the modified and new files
git add infrastructure/15_certman/
git add gitlab-ci-scripts/deploy/build_certman_infra.sh
git add .gitlab-ci.yml

# Commit and push to GitLab
git commit -m "Add the Certificate Manager."
git push origin master
Verification
Check the logs of the “deploy” stage on your CI / CD pipeline on GitLab and make sure there is no error.
Let’s check the status of our “Certificate Manager” ECS instance:
- Open the ECS console;
- Click on the “Instance” item in the left menu;
- Select your region if necessary;
- Search for your instance named “sample-app-certman-ecs-dev”;
- Click on the “Connect” link on the right side of your instance;
- Authenticate yourself with the “root” user and the password you set in your ECS_ROOT_PASSWORD variable (in the GitLab pipeline settings);
- Check that the services “ossfs”, “nginx” and “certificate-updater” are running:
# Check the running services configured with SystemD
systemctl
Note: you can scroll down by pressing the SPACE bar and quit by pressing Q.
- Check Nginx is working as expected:
# Check the "/health" request (the response must be "OK") curl http://localhost:8080/health # Check the "/.well-known/" request (don't forget the last '/', the response must be "It works!") curl http://localhost:8080/.well-known/ - Check the OSS bucket is mounted properly:
# Check that OSSFS is working properly. It should contain the folders "backup", "certificate" and "infrastructure" ls /mnt/oss_bucket - Check the logs of the certificate updater:
# Check the logs of the certificate updater
journalctl --unit=certificate-updater
You can then test the web application from your computer with the following command:
# Check that the SLB is well configured with the new certificate
curl https://dev.my-sample-domain.xyz/
The curl command should succeed with the following logs:
<!DOCTYPE html>
<html>
<head>
    <meta charset="utf-8">
    <title>To-Do list</title>
    <link rel="stylesheet" href="css/index.css" media="screen">
</head>
<body>
<div id="react"></div>
<script src="built/bundle.js"></script>
</body>
</html>
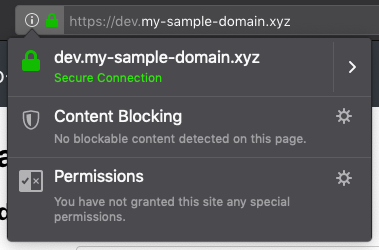
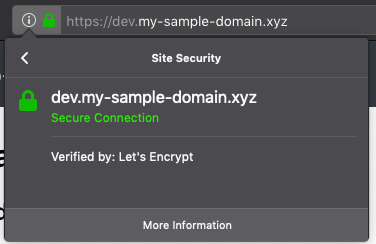
Open your application in your web browser with the HTTPS URL (i.e. https://dev.my-sample-domain.xyz/) and click on the padlock icon on the left of the URL bar. It should indicate that the connection is secured:
Pre-production and production environments
Let’s apply the changes on the pre-production:
- Open GitLab (the URL must be like https://gitlab.my-sample-domain.xyz/);
- Click on the “Projects” item in the top menu and select “Your projects”;
- Click on the “todolist” project;
- In the left menu select “Merge Requests”;
- Click on the “New merge request” button;
- In the source branch, select “master”;
- In the target branch, select “pre-production”;
- Click on “Compare branches and continue”;
- Set the title field to “HTTPS configuration” and click on “Submit merge request”;
- Click on the “Merge” button;
- Follow the pipeline by clicking on the “CI / CD” left menu item.
The pipeline should run with success (unfortunately it now takes about 1h to execute the complete process, mainly because of the Packer scripts).
After the pipeline execution, you can quickly check that it worked with curl:
# Check that the pre-production environment is properly updated
curl https://pre-prod.my-sample-domain.xyz/
The curl command should succeed with the following output:
<!DOCTYPE html>
<html>
<head>
    <meta charset="utf-8">
    <title>To-Do list</title>
    <link rel="stylesheet" href="css/index.css" media="screen">
</head>
<body>
<div id="react"></div>
<script src="built/bundle.js"></script>
</body>
</html>
Let’s do the same with the production environment:
- In your GitLab tab, select the left menu “Merge Requests”;
- Click on the “New merge request” button;
- In the source branch, select “pre-production”;
- In the target branch, select “production”;
- Click on “Compare branches and continue”;
- Set the title field to “HTTPS configuration” and click on “Submit merge request”;
- Click on the “Merge” button;
- Follow the pipeline by clicking on the “CI / CD” left menu item.
Again, the pipeline should succeed like the other branches. After its execution, check the result with curl:
# Check that the production environment is well configured
curl https://www.my-sample-domain.xyz/
The curl command should succeed as well:
<!DOCTYPE html>
<html>
<head>
    <meta charset="utf-8">
    <title>To-Do list</title>
    <link rel="stylesheet" href="css/index.css" media="screen">
</head>
<body>
<div id="react"></div>
<script src="built/bundle.js"></script>
</body>
</html>