Getting started with Rancher
Summary
- Introduction
- Prerequisite
- Rancher installation
- Kubernetes cluster
- Importing the Kubernetes Cluster into Rancher
- Testing
Introduction
Rancher is a multi-cluster Kubernetes management platform. The goal of this tutorial is to explain how to setup Rancher on a single node and how to integrate it with Alibaba Cloud Container Service.
Prerequisite
In order to follow this tutorial, you need to create an Alibaba Cloud account and obtain an access key id and secret.
Cloud resources are created with Terraform scripts. If you don’t know this tool, please follow this tutorial and familiarize yourself with the alicloud provider.
Please also make sure you are familiarized with Kubernetes. If you need, you can follow this tutorial to learn the basics. You will also need to setup the command line tool ‘kubectl’.
Important: please download the related resources before moving to the next section.
Rancher installation
There are two ways to setup Rancher:
- Single-node configuration;
- High-Availability configuration.
We will choose the first way as it makes things simpler.
Open a terminal on your computer and execute the following instructions:
# Go to the folder where you have downloaded this tutorial
cd path/to/this/tutorial

# Go to the Rancher environment folder
cd environment/rancher

# Download the latest stable version of the Alibaba Cloud provider
terraform init

# Configure the Alibaba Cloud provider
export ALICLOUD_ACCESS_KEY="your-accesskey-id"
export ALICLOUD_SECRET_KEY="your-accesskey-secret"
export ALICLOUD_REGION="your-region-id"

# Configure variables for the Terraform scripts
export TF_VAR_ecs_root_password="YourR00tP@ssword"

# Create the resources in the cloud
terraform apply
The last command should ask you to confirm by entering “yes” and should print logs that end like this:
Apply complete! Resources: 9 added, 0 changed, 0 destroyed.

Outputs:

rancher_eip_ip_address = 161.117.4.26
Open a web browser tab and enter the URL corresponding to https://rancher_eip_ip_address (e.g. https://161.117.4.26/). Your web browser will complain that the connection is unsecured (which is normal because we didn’t configure any SSL/TLS certificate); just make an exception and continue browsing.
Note: if using an invalid certificate bothers you, please follow this documentation to setup HTTPS properly.
You should get a page like this:
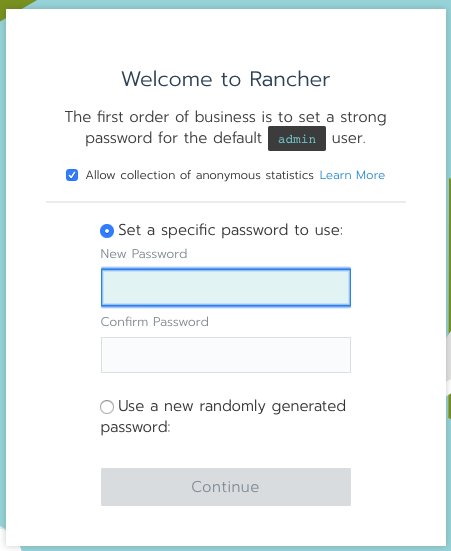
Set an administrator password and click on the “Continue” button. The next step asks you to configure the server URL, just keep the default value and click on “Save URL”.
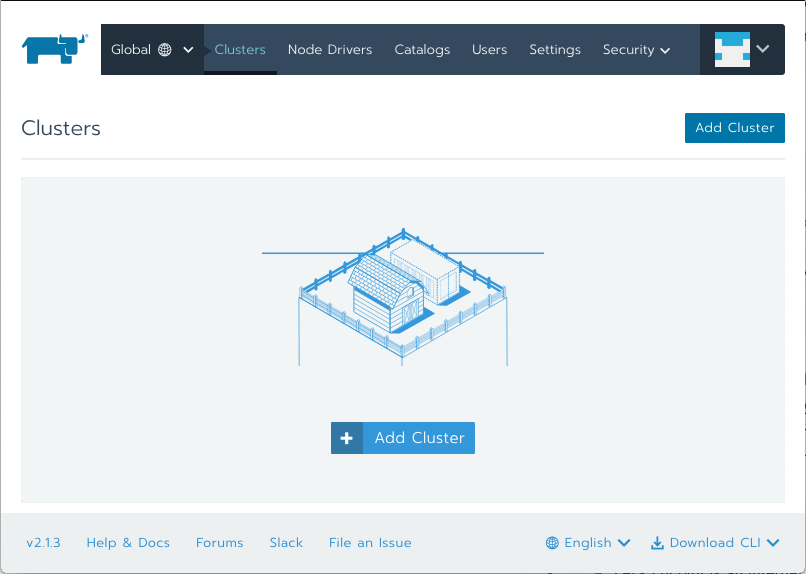
You should then be redirected to the clusters page:
Kubernetes cluster
Unfortunately the integration with Alibaba Cloud Container Service is not yet supported by the current version of Rancher (v2.1.3). However we can create a Kubernetes cluster with Terraform and import it manually to Rancher.
Cluster sizing
Before creating our cluster we need to size it correctly. Currently in Alibaba Cloud, a Kubernetes cluster must have exactly 3 master nodes, but the node instance types (number of CPUs and amount of RAM) and the number of worker nodes are flexible.
Note: this document is a good introduction about the master and worker node concepts in Kubernetes.
This document in Chinese gives advices about which instance type to choose for master nodes; it also provides general tips about cluster administration. Concerning our sizing problem, this article proposes the following configurations:
- 1-5 worker nodes, master specification: 4 vCPUs and 8GB of RAM
- 6-20 worker nodes, master specification: 4 vCPUs and 16GB of RAM
- 21-100 worker nodes, master specification: 8 vCPUs and 32GB of RAM
- 100-200 worker nodes, master specification: 16 vCPUs and 64GB of RAM
According to the same article, the disk size for each master node doesn’t need to be large, as it mainly contains the OS (about 3GB), docker images, system and application logs, temporary data, …etc.
This second document in Chinese explains how to choose the number and the type of workers nodes. It also provides information about network driver, disk size selection and other management tasks.
The first important advice this article provides is to prefer few large workers instead of many small ones:
- A small number of large workers increases the chance of having interdependent containers running on the same machine, which greatly reduces network transmission.
- Large resources (such as network bandwidth or physical RAM) concentrated on few nodes allow better resource utilization. For example if two applications need 1GB of RAM, it is better to collocate them on one worker with 3GB of physical RAM instead of distributing them on two workers with 1.5GB of physical RAM each; in the first case the large worker is able to accept a third application that would also need 1GB of RAM, whereas the two small workers cannot.
- Pulling Docker images is more efficient on a smaller number of workers, because images are downloaded, stored on the local disk, and then re-used between containers.
However a too small number of workers is not a good idea, because a system should continue to function even if a worker node is down. The exact number of workers depends on the total number of required vCPUs and on the acceptable fault tolerance.
Let’s consider the following example where a system needs a total of 160 vCPUs:
- If the fault tolerance is 10%, we cannot lose more than 16 vCPUs, so a valid configuration is 10 workers with 16 vCPUs.
- If the fault tolerance is 20%, we cannot lose more than 32 vCPUs, so a valid configuration is 5 workers with 32 vCPUs.
About the amount of RAM for each worker, the document gives the following rule of thumb in case of applications that are relatively greedy in memory, such as Java applications: a good ratio is 8GB of RAM per vCPU, so if we choose an instance type with 4 vCPUs, then we need to take about 32GB of RAM.
Cluster creation
We will create a Kubernetes cluster in multiple availability zones. This decision increases the availability of the system, but it adds the following constraints:
- Alibaba Cloud Container Service is designed to support either 1 or 3 availability zones;
- In order to be compatible with most of the regions, we can only use 2 availability zones, so we will need to configure our Kubernetes cluster to use twice the same availability zone;
- The minimum number of worker nodes is 3.
Open a terminal on your computer and execute the following instructions:
# Go to the folder where you have downloaded this tutorial
cd path/to/this/tutorial

# Go to the Rancher environment folder
cd environment/kubernetes-cluster

# Download the latest stable version of the Alibaba Cloud provider
terraform init

# Configure the Alibaba Cloud provider
export ALICLOUD_ACCESS_KEY="your-accesskey-id"
export ALICLOUD_SECRET_KEY="your-accesskey-secret"
export ALICLOUD_REGION="your-region-id"

# Configure variables for the Terraform scripts
export TF_VAR_ecs_root_password="YourR00tP@ssword"
export TF_VAR_master_instance_cpu_count=4
export TF_VAR_master_instance_ram_amount=8 # in GB
export TF_VAR_master_instance_disk_size=40 # in GB
export TF_VAR_worker_instance_count=3 # Must be >= 3
export TF_VAR_worker_instance_cpu_count=4
export TF_VAR_worker_instance_ram_amount=32 # in GB
export TF_VAR_worker_instance_disk_size=80 # in GB

# Create the resources in the cloud
terraform apply
The last command should ask you to confirm by entering “yes” and should end with similar logs:
Apply complete! Resources: 16 added, 0 changed, 0 destroyed.

Outputs:

rancher_k8s_cluster_ip_address = 161.117.96.245
Note: don’t worry if the operation takes some time. Creating a cluster typically takes about 15min.
Let’s configure kubectl locally so that it can communicate with the new cluster. Execute the following commands in your terminal:
mkdir $HOME/.kube
scp root@161.117.96.245:/etc/kubernetes/kube.conf $HOME/.kube/config
# Note 0: the IP address is the one from `rancher_k8s_cluster_ip_address`.
# Note 1: the password is the one that was set in `TF_VAR_ecs_root_password`.

# Check that it worked
kubectl cluster-info
If the configuration went well, the result of the last command should be something like:
Kubernetes master is running at https://161.117.96.245:6443
Heapster is running at https://161.117.96.245:6443/api/v1/namespaces/kube-system/services/heapster/proxy
KubeDNS is running at https://161.117.96.245:6443/api/v1/namespaces/kube-system/services/kube-dns:dns/proxy
monitoring-influxdb is running at https://161.117.96.245:6443/api/v1/namespaces/kube-system/services/monitoring-influxdb/proxy

To further debug and diagnose cluster problems, use 'kubectl cluster-info dump'.
Importing the Kubernetes Cluster into Rancher
Now that we have our Kubernetes Cluster, let’s import it into Rancher so that we can manage it from there.
Open your web browser tab with Rancher (the page you got when you finished the Rancher installation section) and follow these instructions:
- The current page must be the “Clusters” one. Click on the “Add Cluster” button;
- Select “Import existing cluster”;
- Set the “Cluster Name” field to “alibabacloud-cluster”;
- Click on the “Create” button.
You should get a page like this:
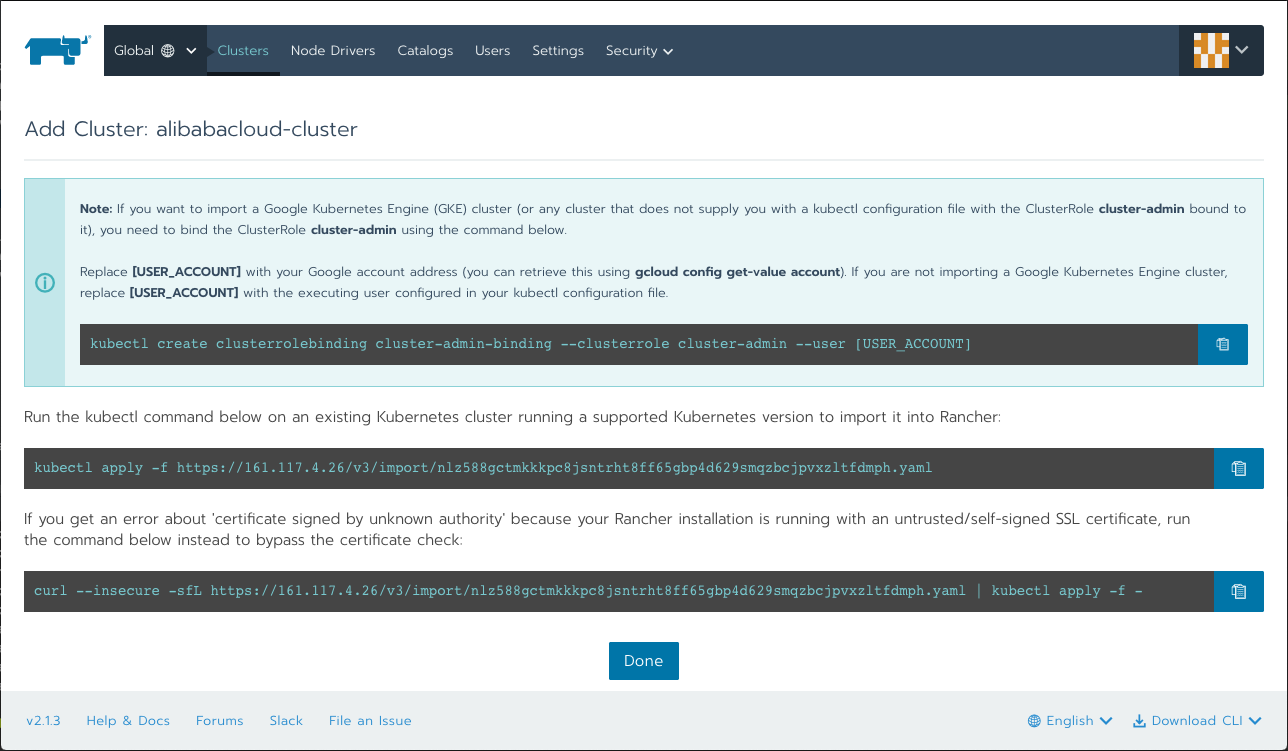
Let’s execute the last command; copy it and paste it in your terminal:
# Command from Rancher in order to import the cluster
curl --insecure -sfL https://161.117.4.26/v3/import/nlz588gctmkkkpc8jsntrht8ff65gbp4d629smqzbcjpvxzltfdmph.yaml | kubectl apply -f -
This command should output the following logs:
namespace/cattle-system created
serviceaccount/cattle created
clusterrolebinding.rbac.authorization.k8s.io/cattle-admin-binding created
secret/cattle-credentials-1d26caa created
clusterrole.rbac.authorization.k8s.io/cattle-admin created
deployment.extensions/cattle-cluster-agent created
daemonset.extensions/cattle-node-agent created
Go back to the web browser tab and click on the “Done” button. You should now see your cluster:
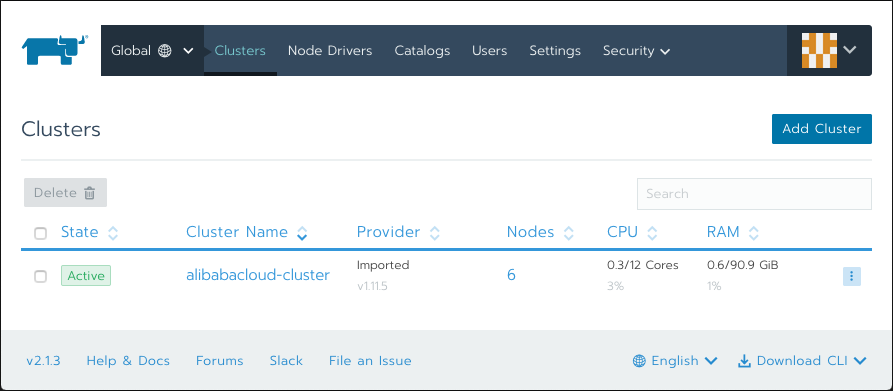
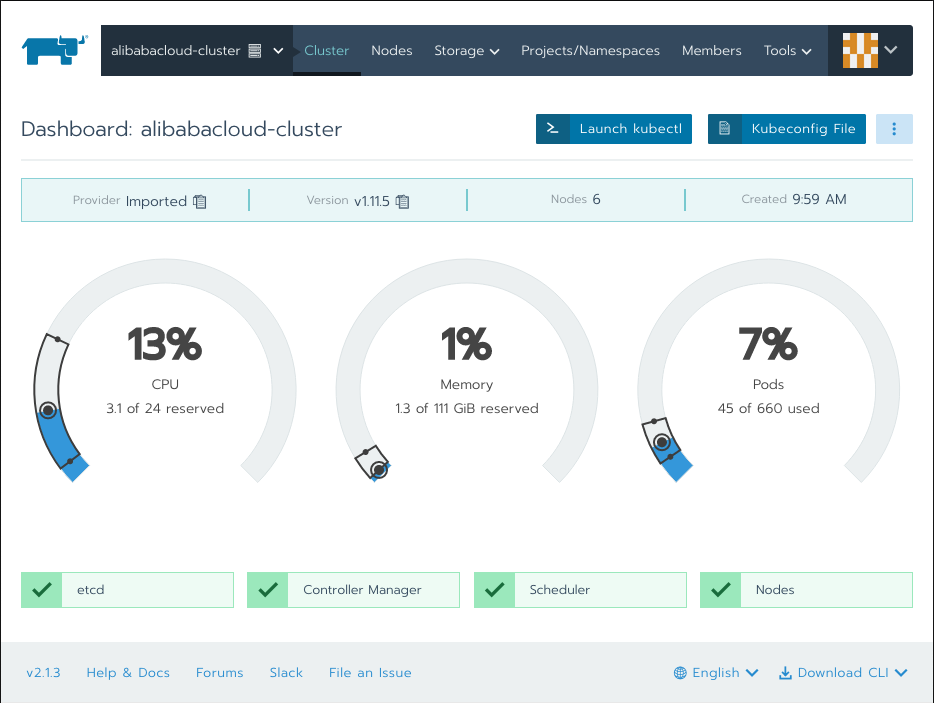
On this page, click on the cluster name (alibabacloud-cluster). You should obtain a dashboard similar to this one:
Testing
Let’s play a bit with Rancher by deploying a small application. Please open your web browser tab with the cluster dashboard and execute the following actions:
- In the top menu, select “Projects/Namespaces”;
- This page displays two projects: “Default” and “System”. Click on “Project: Default”;
- The new page displays the workloads, but it is empty for the moment. Click on the “Deploy” button;
- In this form, set the fields like this:
- Name = hello-workload
- Docker Image = rancher/hello-world
- Scroll down and click on “Show advanced options”;
- Expand “Labels & Annotations” and click on “Add Label”;
- Set the key “app” and the value “hello-app”;
- Click on the “Launch” button.
After few seconds you should see your workload named “hello-workload” with the “Active” status:

Let’s create a load balancer in order to expose this application to internet:
- Click on the “Import YAML” button;
- Copy the following content in the dark text area:
apiVersion: v1
kind: Service
metadata:
  name: hello-app-load-balancer
  labels:
    app: hello-app
spec:
  type: LoadBalancer
  ports:
  - port: 80
    protocol: TCP
    targetPort: 80
  selector:
    app: hello-app
- Click on the “Import” button;
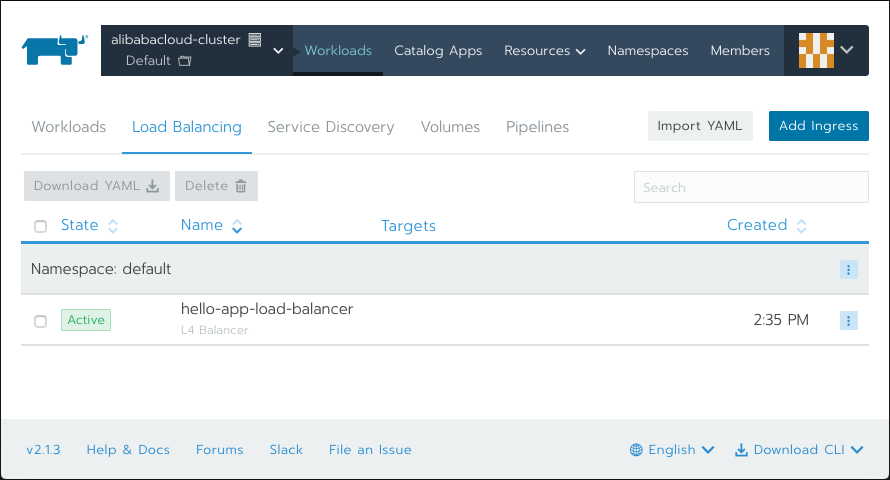
- Click on the “Load Balancing” tab.
You should be able to see your load balancer:
In order to get the IP address of this load balancer, click on the menu button on the right of “hello-app-load-balancer”
(with 3 vertical dots ‘…’) and select “View/Edit YAML”.
You should see a large YAML file. Scroll down until you see the status:
status:
loadBalancer:
ingress:
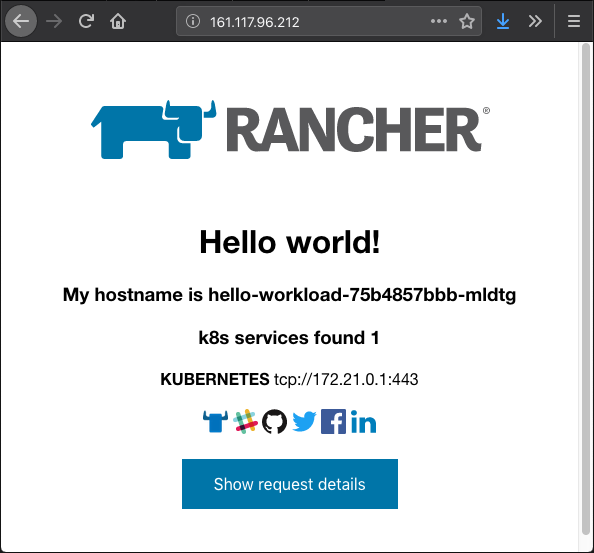
- ip: 161.117.96.212
Copy this IP address and paste it into the URL bar of a new web browser tab. You should be able to access to your application:
Congratulation if you managed to get this far! If you want to continue to learn about Kubernetes and Rancher, please read the official documentation.