DevOps for small / medium web apps - Part 7 - Speeding up CI / CD pipeline
Summary
Introduction
Until now we have been focusing on adding new functionalities to our application (HTTPS and centralized logs). However, in doing so we have slowed down substantially our CI / CD pipeline, as it now takes about one hour to complete the full process.
The goal of this tutorial part is to focus on this slow pipeline problem and to find ways to accelerate it.
Note: you can find the source code containing the modifications described in this part in the folders “sample-app/version6” and “deployment-toolbox/version1”.
Deployment Docker image
The slowest stage of our pipeline is the one responsible for deployment, and its first task is to download and install tools. It usually takes several minutes to complete and unnecessarily wastes resources such as network bandwidth.
A way to speed up this first task is to create our own Docker image, and then use it in our pipeline.
Docker repository creation
The first step is to create a repository via the Container Registry service in order to host our own Docker images. Open a web browser tab and execute the following instructions:
- Go to the Container Registry web console;
- If necessary, select your region on top of the page;
- Click on the “Namespace” left menu item;
- Click on the “Create Namespace” button;
- In the popup form, set a field value corresponding to your domain name such as “my-sample-domain-xyz” (replace dots ‘.’ by dashes ‘-‘) and click on the “Confirm” button. Please note that we use the domain name because namespaces must be unique among all accounts in Alibaba Cloud.
- Click on the “Repositories” left menu item;
- Click on the “Create Repository” button;
- Fill the popup form with the following values:
- Region = your region
- Namespace = your namespace such as my-sample-domain-xyz
- Repository Name = deployment-toolbox
- Summary = Ubuntu with deployment tools (Terraform, Packer, …)
- Repository Type = Private
- Click on the “Next” button;
- Select the “Local Repository” tab and click on “Create Repository”;
We then need to create a RAM user in order to let Docker to access to our repository:
- Go to the RAM web console;
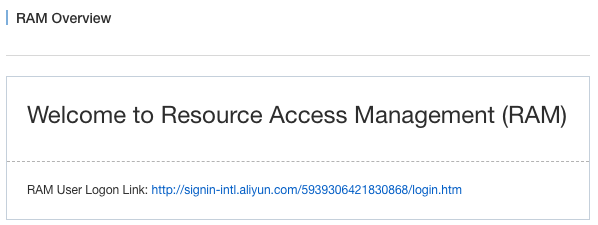
- Copy the URL next to “RAM User Logon Link”, we will use it later;
- Click on the “Users” left menu item;
- Click on the “Create User” button;
- In the popup form set “sample-app-gitlab” in the “User Name” field and click on “OK”;
- The page should refresh itself and display our “sample-app-gitlab” user; click on his “Authorize” link on the right;
- In the new popup, select the policy name “AliyunContainerRegistryFullAccess” and click on the button with an arrow pointing to the right;
- Click on “OK” to close the popup;
- Click on the “Manage” link on the right of the user “sample-app-gitlab”;
- Click on the “Enable Console Logon” button;
- In the popup form, enter twice the same password, uncheck the checkbox “On your next logon you must reset the password.” and click on “OK”;
We now need to set the Docker password for this RAM user:
- Open a private web browser window and browse to the “RAM User Logon Link” URL you copied earlier (it should be something like “http://signin-intl.aliyun.com/5939306421830868/login.htm”);
- Login with your ram username and password (the username should be something like “sample-app-gitlab@5939306421830868”, the password is the one you set earlier);
- Go to the Container Registry web console;
- Click on the button “Reset Docker Login Password”;
- Set a new password and click on “OK”;
- Close your private web browser window.
If you have Docker installed on your computer, you can test your configuration like this:
- Go to the Container Registry web console (with your normal account);
- If necessary, select your region on top of the page;
- The repository “deployment-toolbox” should be displayed; move your mouse cursor on top of the icon that looks like an arrow going into a box under the “Repository Address” column; a popup should open with multiple URLs:
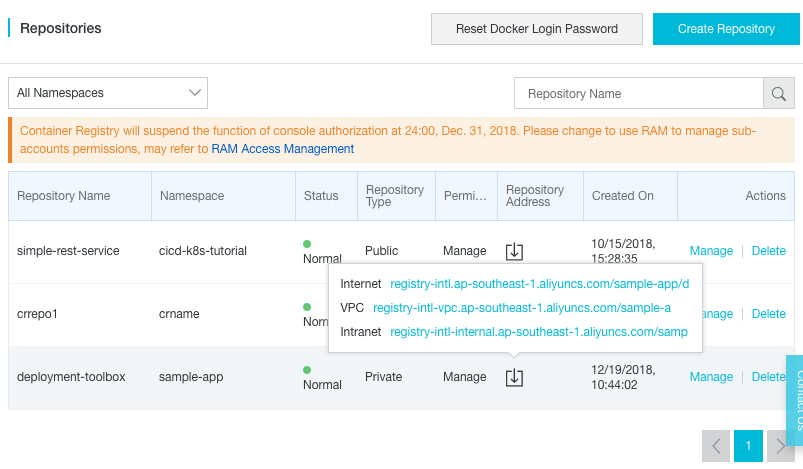
- Click on the first address (next to “Internet”) to copy it (it should be like “registry-intl.ap-southeast-1.aliyuncs.com/my-sample-domain-xyz/deployment-toolbox”);
- Open a terminal and type:
# Test your repository configuration
docker login --username=sample-app-gitlab@5939306421830868 registry-intl.ap-southeast-1.aliyuncs.com
This command should prompt for the password you set earlier when you clicked on “Reset Docker Login Password”. If the configuration is good, the command should print “Login Succeeded”.
Notes:
- The
--usernameargument should besample-app-gitlab@your-user-id-or-enterprise-alias. You can find your user ID or enterprise alias inside the “RAM User Logon Link” you copied earlier (for example if the link is “http://signin-intl.aliyun.com/5939306421830868/login.htm”, then the user ID is 5939306421830868). - The next argument is the domain name of your repository address (for example if the repository address is “registry-intl.ap-southeast-1.aliyuncs.com/my-sample-domain-xyz/deployment-toolbox”, then the argument is “registry-intl.ap-southeast-1.aliyuncs.com”).
- The
Docker image project
The next step is to create a new GitLab project where we will host our Dockerfile:
- Open GitLab (the URL must be like https://gitlab.my-sample-domain.xyz/);
- In the home page, click on the “New project” button;
- Fill the new form with the following information:
- Project name = deployment-toolbox
- Project slug = deployment-toolbox
- Visibility Level = Private
- Click on the “Create project” button;
- In the new page, copy the URL for git (such as “git@gitlab.my-sample-domain.xyz:marcplouhinec/deployment-toolbox.git”).
Open a terminal on your computer and run:
# Go to the projects directory
cd projects

# Git clone our new project (adapt the URL)
git clone git@gitlab.my-sample-domain.xyz:marcplouhinec/deployment-toolbox.git

# Go to the new project folder
cd deployment-toolbox

# Create our Docker image definition file
nano Dockerfile
Copy the following content into the editor:
FROM ubuntu:18.04

ENV OSSFS_VERSION=1.80.5
ENV TERRAFORM_VERSION=0.11.11
ENV PACKER_VERSION=1.3.3

# Install OSSFS
RUN apt-get -y update
RUN apt-get -y install gdebi-core wget unzip libssl1.0.0
RUN wget "https://github.com/aliyun/ossfs/releases/download/v${OSSFS_VERSION}/ossfs_${OSSFS_VERSION}_ubuntu16.04_amd64.deb"
RUN gdebi -n "ossfs_${OSSFS_VERSION}_ubuntu16.04_amd64.deb"

# Install Terraform
RUN wget "https://releases.hashicorp.com/terraform/${TERRAFORM_VERSION}/terraform_${TERRAFORM_VERSION}_linux_amd64.zip"
RUN unzip "terraform_${TERRAFORM_VERSION}_linux_amd64.zip" -d /usr/local/bin/

# Install Packer
RUN wget "https://releases.hashicorp.com/packer/${PACKER_VERSION}/packer_${PACKER_VERSION}_linux_amd64.zip"
RUN unzip "packer_${PACKER_VERSION}_linux_amd64.zip" -d /usr/local/bin/

# Install Python packages
RUN apt-get -y install python3-pip
RUN pip3 install -U aliyun-log-python-sdk

CMD ["/bin/bash"]
Save and quit by pressing CTRL+X. If you have Docker on your machine, you can test this Dockerfile with the following commands:
# Build the Docker image
docker build -t deployment-toolbox:latest .

# Create a container with our new image
docker run -it deployment-toolbox:latest
The last command executes Bash inside the container. Let’s check that our tools are correctly installed:
# Check OSSFS version
ossfs --version

# Check Terraform version
terraform version

# Check Packer version
packer version

# Check our Python dependency version
pip3 show aliyun-log-python-sdk

# Exit and kill the container
exit
Let’s create the GitLab pipeline definition file:
# Create the pipeline definition file
nano .gitlab-ci.yml
Put the following text into this file:
image: docker:stable

variables:
  DOCKER_HOST: tcp://docker:2375/
  DOCKER_DRIVER: overlay2
  REGISTRY_USERNAME: sample-app-gitlab@your-user-id-or-enterprise-alias
  REGISTRY_PASSWORD: your-docker-login-password
  REGISTRY_URL: registry-intl.ap-southeast-1.aliyuncs.com
  IMAGE_URL: registry-intl.ap-southeast-1.aliyuncs.com/my-sample-domain-xyz/deployment-toolbox

services:
  - docker:dind

stages:
  - build

build:
  stage: build
  before_script:
    - docker login -u $REGISTRY_USERNAME -p $REGISTRY_PASSWORD $REGISTRY_URL
  script:
    - docker pull $IMAGE_URL:latest || true
    - docker build --cache-from $IMAGE_URL:latest --tag $IMAGE_URL:$CI_PIPELINE_IID --tag $IMAGE_URL:latest .
    - docker push $IMAGE_URL:$CI_PIPELINE_IID
    - docker push $IMAGE_URL:latest
Save and quit with CTRL+X.
Before we commit and push our changes to GitLab, we first need to add new variables:
- Open your web browser tab with GitLab; the deployment-toolbox project should be displayed;
- In the left menu select “Settings > CI/CD”;
- Expand the “Variables” panel, and create the following variables:
- REGISTRY_USERNAME = the username you already used in the previous section when
you have tested your configuration with
docker login; - REGISTRY_PASSWORD = the password is the one you set when you clicked on the “Reset Docker Login Password” button;
- REGISTRY_URL = the domain name of your repository address;
- IMAGE_URL = your repository address;
- REGISTRY_USERNAME = the username you already used in the previous section when
you have tested your configuration with
- Click on “Save variables”.
Let’s commit the changes to GitLab:
# Check the files to commit
git status

# Add the new files
git add .gitlab-ci.yml
git add Dockerfile

# Commit and push to GitLab
git commit -m "Create the Dockerfile."
git push origin master
Check your CI/CD pipeline (for the “deployment-toolbox” project) and make sure there is no error.
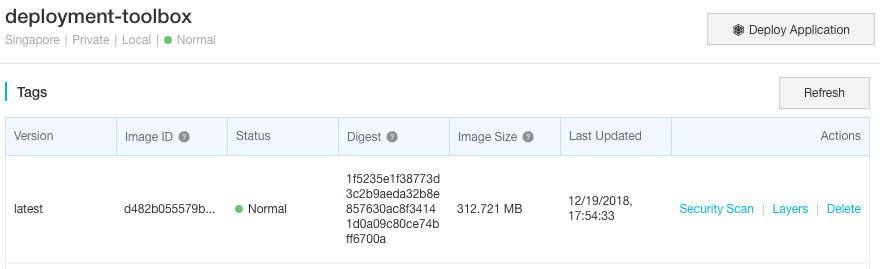
You can also check on the Container Registry web console that the Docker image has been successfully pushed:
- Go to the Container Registry web console;
- Click on the “Manage” link next to the “deployment-toolbox” repository;
- Click on the “Tags” left menu item.
The page should display your image tags:
Pipeline update
Let’s update our pipeline in order to use our Docker image. Open your terminal and run:
# Go to the web application project folder
cd ~/projects/todolist

# Remove the tool installation scripts
rm gitlab-ci-scripts/deploy/install_tools.sh
rm gitlab-ci-scripts/deploy/install_python_packages.sh

# Edit the pipeline definition file
nano .gitlab-ci.yml
Apply the following modifications to this file:
- Remove
TERRAFORM_VERSION: "0.11.11"andPACKER_VERSION: "1.3.3"from thevariablesblock; - In the
deployblock, replace theubuntu:18.04image by your image; it should be something likeregistry-intl.ap-southeast-1.aliyuncs.com/my-sample-domain-xyz/deployment-toolbox:latest; - In the
deployblock, remove the two scripts- "./gitlab-ci-scripts/deploy/install_tools.sh"and- "./gitlab-ci-scripts/deploy/install_python_packages.sh".
Save and quit with CTRL+X.
Before we commit our changes, we should configure GitLab because our Docker repository is private:
- Open GitLab (the URL must be like https://gitlab.my-sample-domain.xyz/);
- Switch to the “todolist” project;
- Click on the left menu item “Settings > CI/CD”;
- Expand the “Variables” panel, and create the variable DOCKER_AUTH_CONFIG with the following content:
{ "auths": { "registry-intl.ap-southeast-1.aliyuncs.com": { "auth": "3dFtcGxlLXFwcC1naXRsYWJAMTkzOTMwNjQyMTgzDMg2ODpIYW5nemhvdTEw" } } }Notes:
- The URL
registry-intl.ap-southeast-1.aliyuncs.commust be adapted to your registry domain name. - The
authvalue3dFtcGxlLXFwcC1naXRsYWJAMTkzOTMwNjQyMTgzDMg2ODpIYW5nemhvdTEwis a base64 string build like this:echo -n "sample-app-gitlab@your-user-id-or-enterprise-alias:your-docker-login-password" | base64
- The URL
- Click on “Save variables”;
We can now commit the changes:
# Check the files to commit
git status

# Add the modified and deleted files
git add .gitlab-ci.yml
git add gitlab-ci-scripts/deploy/install_tools.sh
git add gitlab-ci-scripts/deploy/install_python_packages.sh

# Commit and push to GitLab
git commit -m "Replace the Ubuntu image by our deployment-toolbox."
git push origin master
Check your CI / CD pipeline on GitLab, the “deploy” stage should be slightly faster.
Parallelization
The main reason the deploy stage takes so much time is because of the creation of the VM images. Fortunately this stage can be done in parallel: after we deploy the basis infrastructure (VPC, SLB, …), we can create / update the web application and the certificate manager cloud resources at the same time. Open your terminal and execute the following commands:
# Go to the web application project folder
cd ~/projects/todolist

# Edit the pipeline definition file
nano .gitlab-ci.yml
Let’s start by replacing the deploy stage by deploy_basis and deploy_apps:
stages:
  - build
  - quality
  - deploy_basis
  - deploy_apps
Then split the deploy job into 3 blocks:
deploy_basis:
  stage: deploy_basis
  image: registry-intl.ap-southeast-1.aliyuncs.com/my-sample-domain-xyz/deployment-toolbox:latest
  script:
    - "export ENV_NAME=$(./gitlab-ci-scripts/deploy/get_env_name_by_branch_name.sh $CI_COMMIT_REF_NAME)"
    - "export SUB_DOMAIN_NAME=$(./gitlab-ci-scripts/deploy/get_sub_domain_name_by_branch_name.sh $CI_COMMIT_REF_NAME)"
    - "export BUCKET_LOCAL_PATH=/mnt/oss_bucket"
    - "./gitlab-ci-scripts/deploy/mount_ossfs.sh"
    - "./gitlab-ci-scripts/deploy/build_basis_infra.sh"
    - "python3 ./gitlab-ci-scripts/deploy/update_logtail_config.py $ALICLOUD_ACCESS_KEY $ALICLOUD_SECRET_KEY $ALICLOUD_REGION $ENV_NAME"
    - "umount $BUCKET_LOCAL_PATH"
    - "sleep 10"
  only:
    - master
    - pre-production
    - production

deploy_webapp:
  stage: deploy_apps
  image: registry-intl.ap-southeast-1.aliyuncs.com/my-sample-domain-xyz/deployment-toolbox:latest
  script:
    - "export ENV_NAME=$(./gitlab-ci-scripts/deploy/get_env_name_by_branch_name.sh $CI_COMMIT_REF_NAME)"
    - "export BUCKET_LOCAL_PATH=/mnt/oss_bucket"
    - "./gitlab-ci-scripts/deploy/mount_ossfs.sh"
    - "./gitlab-ci-scripts/deploy/build_webapp_infra.sh"
    - "umount $BUCKET_LOCAL_PATH"
    - "sleep 10"
  only:
    - master
    - pre-production
    - production

deploy_certman:
  stage: deploy_apps
  image: registry-intl.ap-southeast-1.aliyuncs.com/my-sample-domain-xyz/deployment-toolbox:latest
  script:
    - "export ENV_NAME=$(./gitlab-ci-scripts/deploy/get_env_name_by_branch_name.sh $CI_COMMIT_REF_NAME)"
    - "export SUB_DOMAIN_NAME=$(./gitlab-ci-scripts/deploy/get_sub_domain_name_by_branch_name.sh $CI_COMMIT_REF_NAME)"
    - "export BUCKET_LOCAL_PATH=/mnt/oss_bucket"
    - "./gitlab-ci-scripts/deploy/mount_ossfs.sh"
    - "./gitlab-ci-scripts/deploy/build_certman_infra.sh"
    - "umount $BUCKET_LOCAL_PATH"
    - "sleep 10"
  only:
    - master
    - pre-production
    - production
As you can see the deploy_apps stage has 2 jobs: deploy_webapp and deploy_certman. We didn’t change the
scripts, just execute them in parallel.
Save the modifications and quit with CTRL+X.
Before we commit we need to modify the GitLab Runner configuration in order to allow it to run multiple jobs at the same time:
- Open the ECS console;
- Click on the “Instance” item in the left menu;
- Select your region if necessary;
- Search for your instance named “devops-simple-app-gitlab-runner”;
- Click on the “Connect” link on the right side of your instance;
- The VNC console should appear, authenticate yourself with the “root” user and the password you set when you configured GitLab;
- Edit the GitLab Runner configuration file with this command:
nano /etc/gitlab-runner/config.toml - Replace the parameter
concurrent = 1byconcurrent = 2; - Save and quit by pressing CTRL+X;
- Restart the GitLab Runner via the following command:
gitlab-runner restart - Quit the VNC session by entering the command
exitand by closing the web browser tab.
Go back to your terminal and commit the changes to GitLab:
# Check the files to commit
git status

# Add the modified file
git add .gitlab-ci.yml

# Commit and push to GitLab
git commit -m "Parallelize deployment."
git push origin master
This time the GitLab pipeline contains 4 stages with 2 parallels jobs for the last one:

As usual, you can now merge the master branch to pre-production, and then pre-production to production.